Hi,
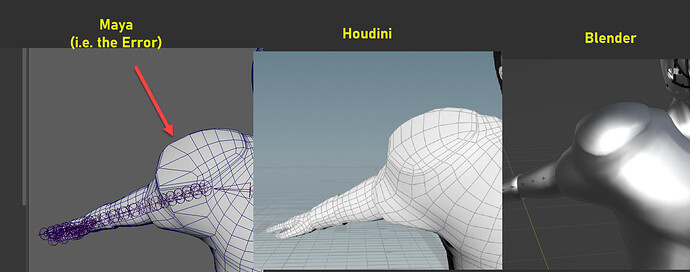
For some reason, Maya Erroneously Reweights FBX Character from Houdini.
I can confirm this because when I move one the joints, the deformation is its as if reskinned with the verts having only influence with one joint (i.e. no smoothing happening).
I tried reopening the same exported FBX in Houdini itself and it works.
I tried opening the same file in Blender. It works.
And for good measure, I asked a colleague to open it in C4D, it works.
The deformation works as expected.
It’s only in Maya.
So I was wondering if its something with my import options.
I tried resetting it to default.
I tried normalizing the weights.
But it still gives me wonky deformation.
Am I missing something here? 
I’m not sure how to get the FBX ROP or Character ROP to export the bones, so I haven’t been able to test yet. I’m checking “Force Skin Deform Export”, but I only get geometry in my file. I’ll keep reading docs and trying.
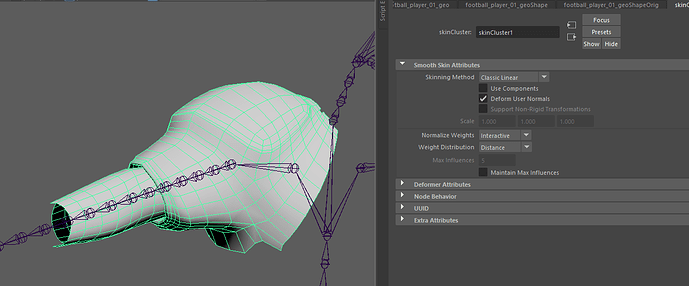
If you look at your skinCluster in the Maya attribute editor, is “maintain max influences” on and set to a low number? If it is, that could be the problem. But as far as I know, it should import as max 5, but maintain max influences should be checked off. So that shouldn’t be the problem.
If you look in your skinCluster component editor, how many influences does one of those points have? Is it actually just one influence?
Any Maya errors or warnings in the FBX window, or the script editor?
Did you figure this out yet?
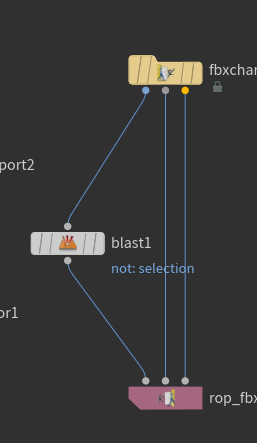
I figured out how to export properly using rop_fbxcharacteroutput. And I don’t see this problem. The weights come in to Maya (2022) correctly for me. Even if I smooth out the weights to have much more than 5 influences per vertex.
1 Like
Hi @clesage
Terribly sorry for the late response.
Got caught in the production and I ended up brute forcing it. (i.e. remove the skinning and just import the animation).
RE: And I don’t see this problem.
I’ll try to create an illustration so you can test it for yourself.
I’ll just have to cut some parts of the mesh since I can’t give the whole mesh due to NDA.
Talk to you in awhile.
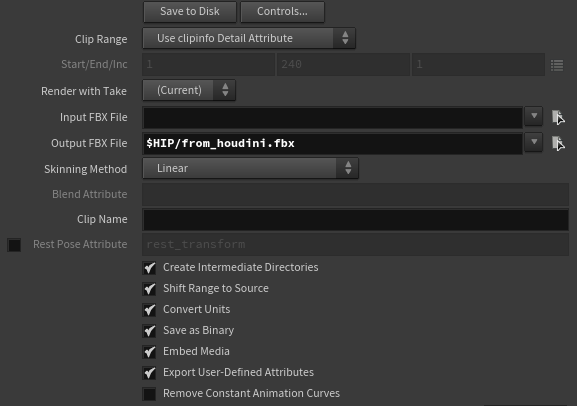
I suggest you just share a screenshot of your skinCluster settings in the attribute editor. And/or the FBX export settings from Houdini.
Are you exporting with the rop_fbxcharacteroutput SOP?
@clesage
Just for good measure. Please see the cut parts of the file here
If you try to import the file in Maya, it just reweights everything.
But if you try to import the file in Houdini, it works as expected.
My hunch so far, is that because Houdini somehow converts the grp/nulls in Maya to actual joints. And it somehow confuses Maya that these are actual joints but they are not.
Import Maya. Skin Cluster Options.
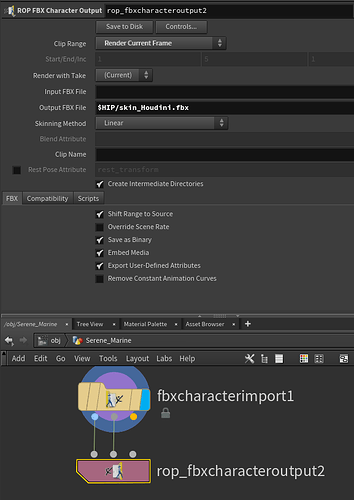
Export Houdini. Character ROP options.

I do not have acces to maya anymore,
Have you tried importing the caracter + animation as an actor in houdini.
then saving that as a USD and importing that into maya ?
1 Like
When importing into Maya 2022, I see the same problem.
When importing into Houdini it works fine.
When importing into Unreal it also works fine. The skinning is there in the file…
When importing into Maya 2020, I got the following warning:
The imported scene has no initial binding position (Bind Pose) for the skin. The plug-in will compute one automatically. However, running the ‘Go To Bind Pose’ command may create unexpected results.
So I added a “rest” and “rigdoctor” SOP to the skeleton, and exported from Houdini again. And then in Maya, I get matching weights to Houdini. But I don’t think that was the fix! Because if I turn them both off, it still works. So I’m not exactly sure what I did! 
This is a guide that I used that goes through all the steps (and errors) of the rop_fbxcharacteroutput SOP. https://www.youtube.com/watch?v=mUjxb3hFWwU
You might want to change “Clip Range” to “Render Current Frame”, and skip the 3rd input, since you are just exporting a static skeleton. Otherwise, sorry I’m not sure without seeing your Houdini setup. It might be something to do with your name or path attributes. Something that C4D and Blender just ignore…?
1 Like
@NicTanghe @clesage
Thanks for the response.
As to the set-up, it’s just a straight forward import FBX and export from Houdini

And that causes the error for some reason. So probably there’s some weird inter DCC mismatch configuration happening because it works on other DCC, it’s only on Maya that it does not.
I also tried the rest and rig doctor SOP and fiddle with the YT link provided above but still no avail.
Anyway, I rest my case on this one for now. I just used the the animation skeleton (from houdini) and used a working skinned character (not from houdini).
This issue is still present in Maya 2024 and Houdini 20.5.445, Using rop_fbxcharacteroutput to FBX file and importing in Maya causes skin weights in Maya are incorrect.
Though this doesn’t happen in Blender : importing the same FBX from Houdini to Blender i see skin weights are correct. Next i try to export the mesh and armature from Blender again to a new FBX,
and on import to Maya skin weights are correct.
Conclusion to that is Blender somehow fixes the issue.
So my workaround with that is: Houdini > FBX > Blender > FBX > Maya

